How to Make Disney Frozen Cookies – How to Make Olaf Cookies
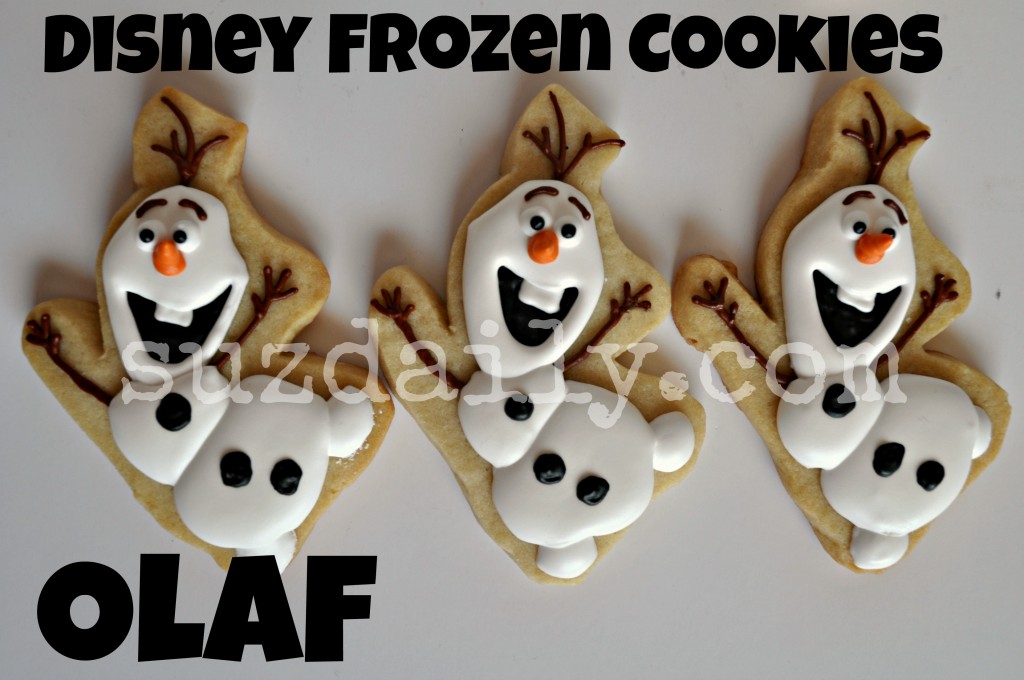 I had so much fun making these Disney Frozen cookies for my niece’s birthday party. They were a hit. This Olaf cookie just makes me happy! I also had success with a new icing recipe. It dried soft! No aching teeth like you sometimes get from rock hard royal icing. I would highly suggest giving royal glaze icing a try.
Keep reading for details on how to make Disney Frozen Cookies and How to make Olaf Cookies.
Step 1: How to Make Disney Frozen Cookies – How to Make Olaf Cookies – Gather supplies
For these cookies you will need the following:
- sugar cookie dough, recipe found here
- royal icing, recipe found here OR royal glaze icing, recipe found here
- 3 inch image of Olaf
- food safe cardstock for template
- americolor super black gel food dye
- americolor orange gel food dye
- americolor chocolate brown gel food dye
- size 2 round tip (or PME size 1.5) for outlining
- size 1 round tip (or PME size 1) for details
- plastic squeeze bottles for flooding sections
Step 2: How to Make Disney Frozen Cookies – How to Make Olaf Cookies – Prepare cookie dough
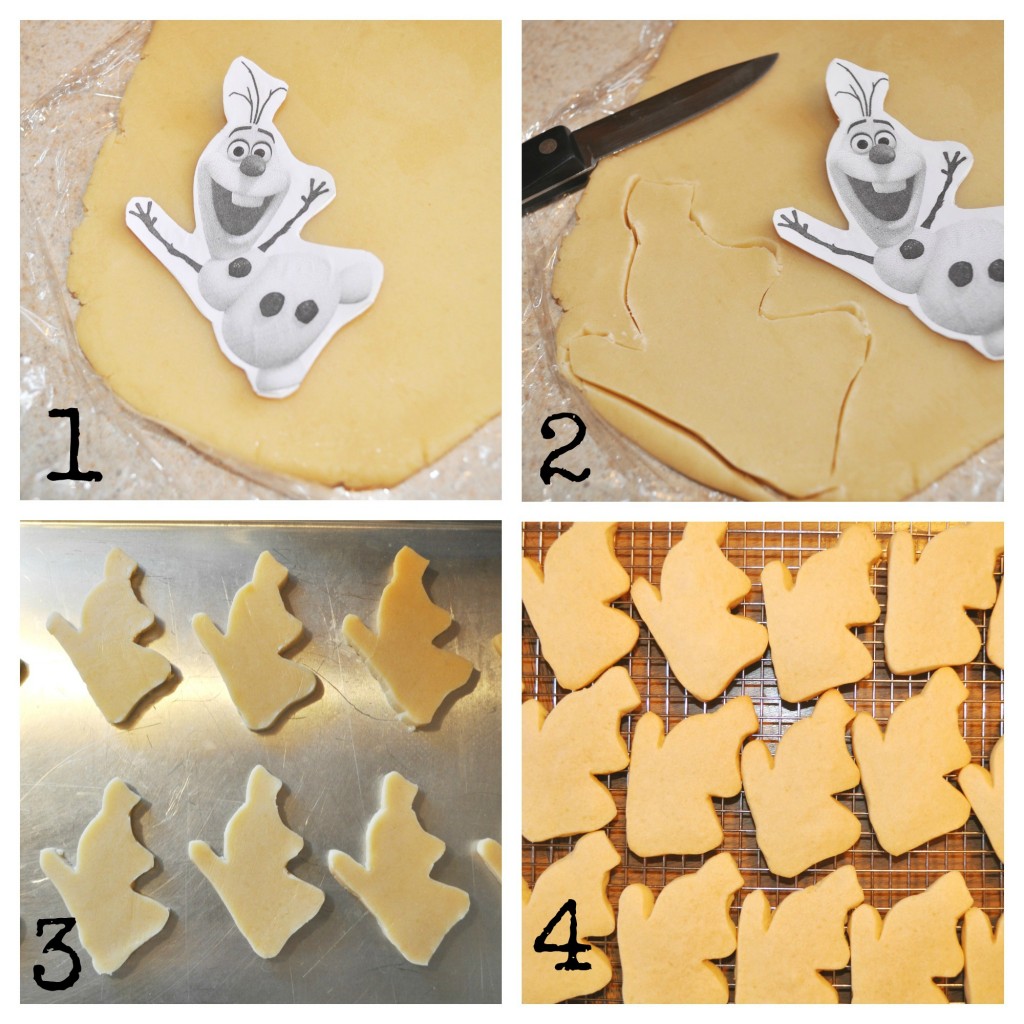
Use whatever sugar cookie dough recipe you prefer. I make my cookie dough as outlined in the following post. Lately, after mixing the dough I roll it into thin sheets between two layers of saran wrap and freeze until I am ready to use. I place the dough on the counter until it warms to room temperature before cutting shapes. After shapes are cut I chill the dough again so there is minimal spreading in the oven.
Step 3: How to Make Disney Frozen Cookies – How to Make Olaf Cookies – Cut shapes, chill, bake & cool cookies
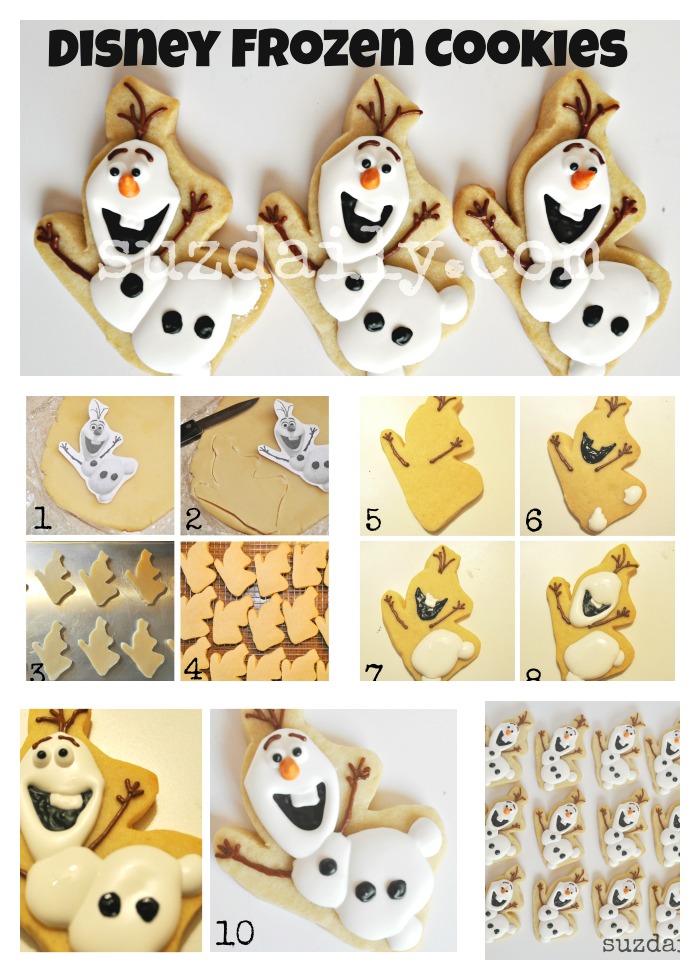
1) Place the Olaf image on food safe cardstock and cut around the image.
2) Use the template and a sharp paring knife to cut out the Olaf cookie shapes on chilled sheets of cookie dough.
3) Place the cut shapes on a baking sheet and put in the freezer for at least fifteen minutes. Bake as directed in recipe.
4) Cool Olaf cookies.
Step 4: How to Make Disney Frozen Cookies – How to Make Olaf Cookies – Prepare Royal Icing or Royal Glaze icing
Follow directions for EITHER royal icing or royal glaze icing. If possible, dye the icing 1-2 days before making the cookies. I of course waited until the last minute to make my icing. You will need the following icing:
- White icing for outlining (thinned to soft peaks), white icing for flooding (thinned to corn syrup consistency)
- Black icing for eyes, buttons and mouth details (thinned to soft peaks) – use Americolor super black
- Brown icing for arms & hair details (thinned to soft peaks) – use Americolor chocolate brown
- Orange icing for carrot nose (keep icing stiff for this detail) – use Americolor orange.
Step 4: How to Make Disney Frozen Cookies – How to Make Olaf Cookies – Decorate cookies
I am decorating this cookies in stages to give the cookies a nice 3D effect. You do not have to follow the exact order that I did, just be sure to outline and flood alternative sections of the cookie. Wait about 30 minutes between each step. I made 2 dozen of these cookies so by the time I added the first layer of icing I was able to go back to the first and add additional icing. I also use a heated fan to help prevent craters in the icing and to speed drying time. Check out one of my favorite blogs, Sweet Sugarbelle’s for details on consistency, outlining, flooding, etc.
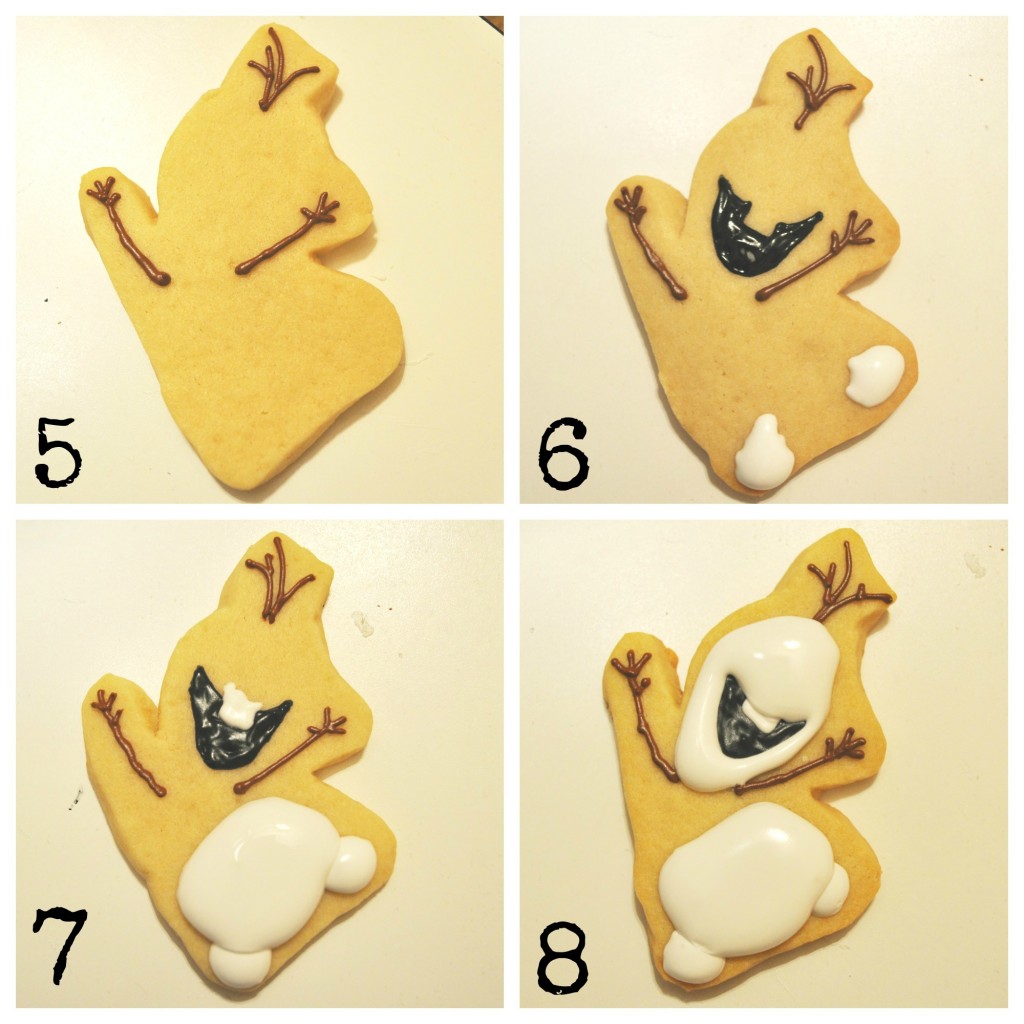
5) Using a PME 1.5 round tip or a Wilton 1 round tip add the arms and hair. I decided to do this first so it would look as though the sticks were coming out of our Olaf cookie. Let set for a moment before continuing.
6) Outline the feet with a fine round tip and flood the feet with the thinned white icing using the plastic squeeze bottle. This is done first because I wanted these to appear under the base of the body. Also add black icing for the inside of the mouth using a fine round tip. Allow these sections to set before proceeding.
7) Add the tooth using thick white icing and a fine round tip. Add the base of the Olaf cookie body by outlining with a fine round tip and flooding with the plastic squeeze bottle. Again, allow this layer to set.
8) Add the head on top of the tooth and the mouth. Outline and flood with white icing.
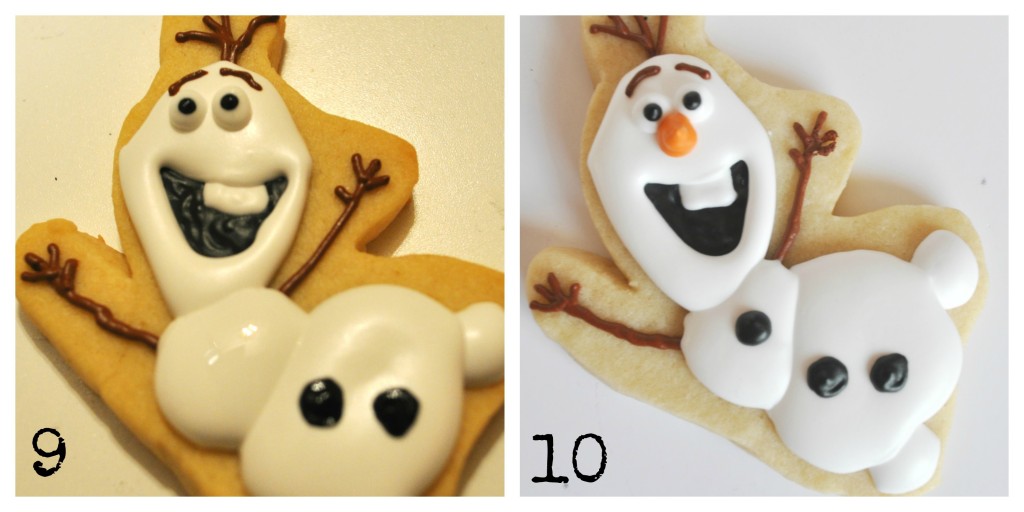
9) When the previous sections have set add the middle section of the snowman. Also use thick white and black royal icing for the Olaf cookie’s eyes. Use the black royal icing for the lower buttons.
10) Almost done! What time is it? For me… about 3 AM. The Disney Frozen cookie is almost done! Olaf is literally dancing off the cookie sheet! Add the final details – one last button with black icing, the carrot nose with the thick orange icing, and the eyebrows with the brown icing.
Step 5: How to Make Disney Frozen Cookies – How to Make Olaf Cookies – Dry cookies over night & package
My cookies are dry in about 8 hours because I live in a nice dry climate. I usually make a tester cookie when I finish decorating so I make sure it is dry through. The cookies are now ready!
These would be great paired with simple snowflakes! These made perfect party favors.



Soooooooooooo cute. Love it suz
Thanks Bina! These were so fun to make for Lily.
Hi, I follow your facebook pge since 2012 , I love the way you explain your cookies, they are just so adorable, I love them, thanks so much and please make more posts I love to see and sometimes bake some cookies
Valerie!
Thanks so much! You just made my day! The tutorials take so much time – I will keep working on them.
Thanks again for the feedback!
Suzanne 🙂
Thanks so much for the tutorial. I have made Olaf cookies twice now. They are very challenging. I enjoyed seeing how someone else does it!! I used the Olaf cookie cutter sold by Truly Mad Plastics so that makes it a lot easier than hand-=cutting!!! Thanks again.
What?! There is a cookie cutter out there!! That would save SO much time. I need to be more organized. Usually I make cookies so last minute that hand cutting is my only option. Once I made cute little turtles for a baby shower and there was no time to buy a cutter – so I hand cut 24! I need to check out truly mad plastics!
Thanks for looking!
Suzanne 🙂
I LOVE this and of course I am waiting until the last minute. (My daughter’s birthday party is this Saturday (4/5). Can you use store bought icing and if so what kind? I work so I will be doing this in the evening after homework and dinner are done. I found a lady in my city that makes them and charges $48 for 24. I KNOW i could prob make them cheaper!
Thanks!
Wendy – I’m so glad you like these. $48 for 24 is actually pretty reasonable if you figure all the time it takes. I think I stayed up until 2am making these for my niece. It take so long to make all the icing. You can not buy pre-made royal icing at a grocery store; however, making royal icing is pretty straight forward. I have attached the recipe to the blog. Royal icing is what gives the cookies a puffy 3D look. When I have been short time I make cupcakes, print out a cute image and put it on a toothpick (that’s just a thought – life is so busy, right?!)
I am rambling, I have figured the cost of ingredients is about $15 for a batch of cookies. If you wanted you could make simple snowmen cookies using grocery store cake frosting, buy pre-made icing eyes from a craft store, and make details like the buttons and nose from whatever you can think of. I know some people use the fruity tootsie rolls and roll them into different shapes. So for the nose you could use orange tootsie rolls to make a carrot. For the buttons you could cut regular tootsie rolls into small pieces. As for the arms, what about melted chocolate carefully drizzled using a ziploc bag? The mouth will be difficult to make – you could try keeping it very simple with black licorice?
It is hard to get the details with grocery store icing. If you can – try making the royal icing. You will spend at least $15 on ingredients and another $15 on supplies (that you can use over and over) –
Please let me know if you want to know more!
Suzanne 🙂
Thanks! I will give it a try! Fingers crossed!
Wendy
You can do it!! Remember it doesn’t have to be perfect – it’s just a cookie!
I will be using my kopykake, where did you find your image? Could you send it to me? I just received my kopykake last Friday. The most challenging part for me is getting images the right size:( Any help would be greatly appreciated.
Thanks
Mendy
Hi Mendy,
Yes I will email it to you. It was just from a google image search. I usually resize on word. Place the view at 100% and that is what size the image will be when printed. The kopykake does allow for slight adjustments. I usually make about 4 sizes on word and use whichever works best.
Also, when I made these olaf was small – maybe only 3.5 inches tall??? That made it difficult to make the details. Next time I will make him bigger. I would rather use up more dough and icing then have to work so carefully on tiny facial features.
Look for my email!
Thanks!
Suzanne 🙂
such a cute and creative cookies! Love it!
Thank you so much!
Suzanne 🙂
These are great! thank you! had a quwstion about the bleeding of colors – Is there a way to reduce it? Is it the type of royal icing, the gel color or is it timing? I noticed you said to color it days ahead. I have never done that and have had bleeding with darker colors. I also live in a very humid climate. Any thoughts are appreciated!!!
Isa,
If bleeding can be an issue, I would want to use as little food coloring as possible. Dye the icing to a grayish color about two days before and watch as it gets darker. When you are ready to decorate, add enough super black to make the icing black.
Also, for a humid climate I would recommend some sort of heat fan, regular fan or something to help dry the icing out. A lot of decorators are using food dehydrators to get the icing to set up. Humidity can be a big problem when getting cookies to dry. The dehydrator may be a worthwhile investment for you if you plan on making a lot of cookies. If you are just making them every now and then you could try using something you already own. A little portable heater/fan has been great for helping my cookies set up. Let me know if you want more details.
Suzanne 🙂
OMG SO CUTE
Thank you!!!
I BETT IS SO FUN TO COOK !!!!!!!!!!!!!!!!!!!!!!!!!!!!!
Very fun! Thank you!!!
Hi! I’m thinking of making these cookies as a christmas present, but how long time will it take before they start to get too old to eat? And will the icing melt if I have them in room temperature?:-)
I think they stay fresh for about a week. No the icing will not melt.