How to Make a Purple Minion Cake
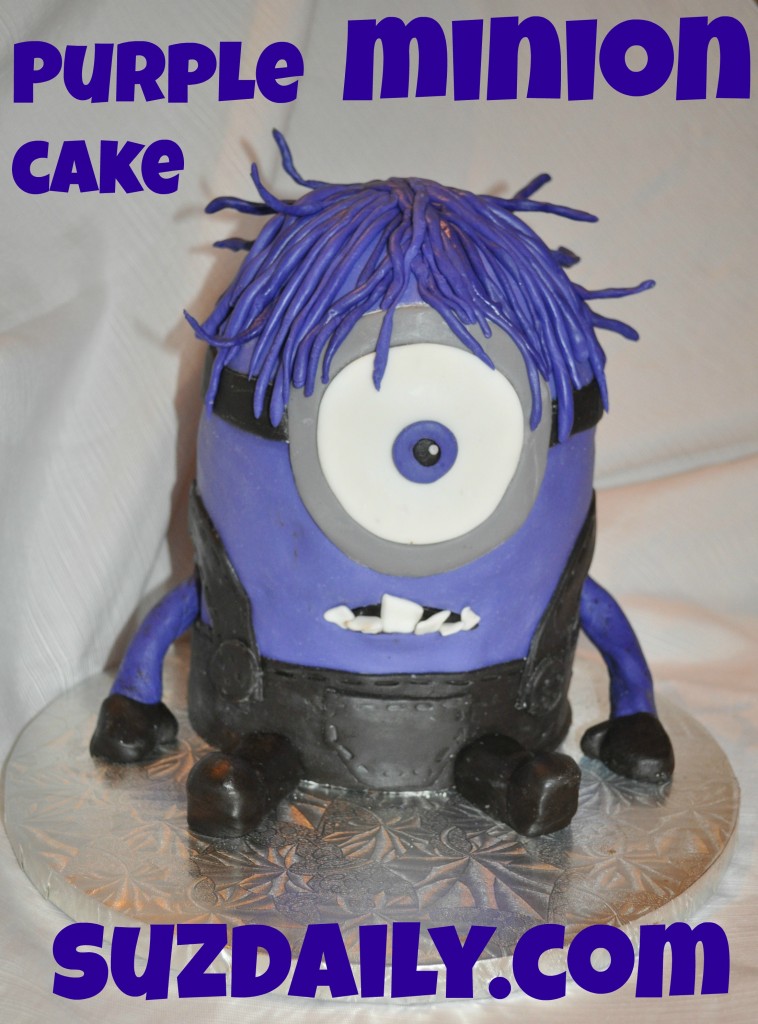 Here it is – the “how to make a purple minion cake” tutorial you have all been waiting for ;). Purple minions are so 2013, but I think the movie Despicable Me movies are a new classic! What is cuter than a minion? I made a regular version of this cake (click here) last Fall for Matilda and one of her cousins who came to the party decided he wanted a purple minion cake. After making a regular minion cake it was fairly simple figuring out how to make a purple minion cake. One thing that I spent hours thinking about – the crazy hair!!!! If I could, I would have made a big puff of hair out of purple cotton candy. I almost went to Walmart at midnight to buy a mini cotton candy machine – but realized it didn’t come with purple sugar. So next time, I will improve the purple minion cake by making crazy hair!
 Before I continue with this tutorial I have to share this picture of my brother John holding the purple minion cake on the way to the party. This was back in December, on the evening of a huge snow storm. We chose to take public transportation to the party to avoid driving in the snow. It was hilarious taking this little guy on and off the light rail and onto the high speed train. What better way than carrying a minion cake to cheer up grumpy commuters headed home.
For the regular minion cake click here.
For details on how to make a purple minion cake keep reading:
How to Make a Purple Minion Cake – Practical tips and blah blah blah
Okay so why would you ever spend hours on a cake… it’s crazy, right? All that time and effort and the end it’s just a pile of crumbs… Well at one point when my oldest daughter was turning 12 I realized I only had 6 more birthdays with her at home. And when my youngest was born, I realized with her the next 18 birthdays would go by so so fast. I decided I would sacrifice a bit of sleep to make their birthdays special with a cake of their choice (cake boss!!!! stop setting the expectations so high!!!) My cakes end up a bit lumpy and I think the fondant has tares in it. Let’s not mention the fact that I get powdered sugar EVERYWHERE.
Well, when the attention is on the birthday child (and the cake) all the time and energy is worthwhile. That magical moment when the candles are lit and everyone is singing – that – that is why I make the special cake. I could not afford to pay someone else to do this for me – so I try my best and the kids appreciate even an imperfect product. And you know what makes me sad? The realization that soon my kids will be grown up and the magical years when they want a purple minion cake are over… Thank you Angie for making me realize how special a birthday cake is! So that is the blah blah blah portion of this post.
As to the tips on making the purple minion cake – DO NOT TRY TO BAKE AND DECORATE ALL IN ONE DAY. Okay I wrote it in all caps and bold so you really get it. If you have to do it all at once, be prepared to stay up very very late. I prefer to bake the layers ahead of time. Wrap them tightly in saran wrap and freeze the cake layers for the purple minion cake. This helps 1) by saving time before the event and 2) a frozen cake is easier to frost than one that is warm or even at room temperature. All my cakes are covered in a thick coat of buttercream frosting before the fondant goes on. This is a lot easier to do on a cold layer of cake. I keep the icing thick because I actually don’t like fondant. I see it more as an ‘edible saran wrap’ – making decorating, and transporting easier. I simply peel it off the slice before serving (unless there is a kid begging for purple minion cake skin). So be sure to do the shopping, and baking ahead of time. You will thank me the day of the party!
Step 1 – How to Make a Purple Minion Cake – Gather supplies for baking and decorating.
I have done my best to list the supplies needed for baking and decorating the purple minion cake. Forgive me if I left something out! Do the shopping ahead of time so you are not stuck running out to a super center in the middle of the night. Some of the decorating tools are more of a luxury – but as I know I will continue to make cakes for my kids I prefer to invest in a few cake decorating tools.
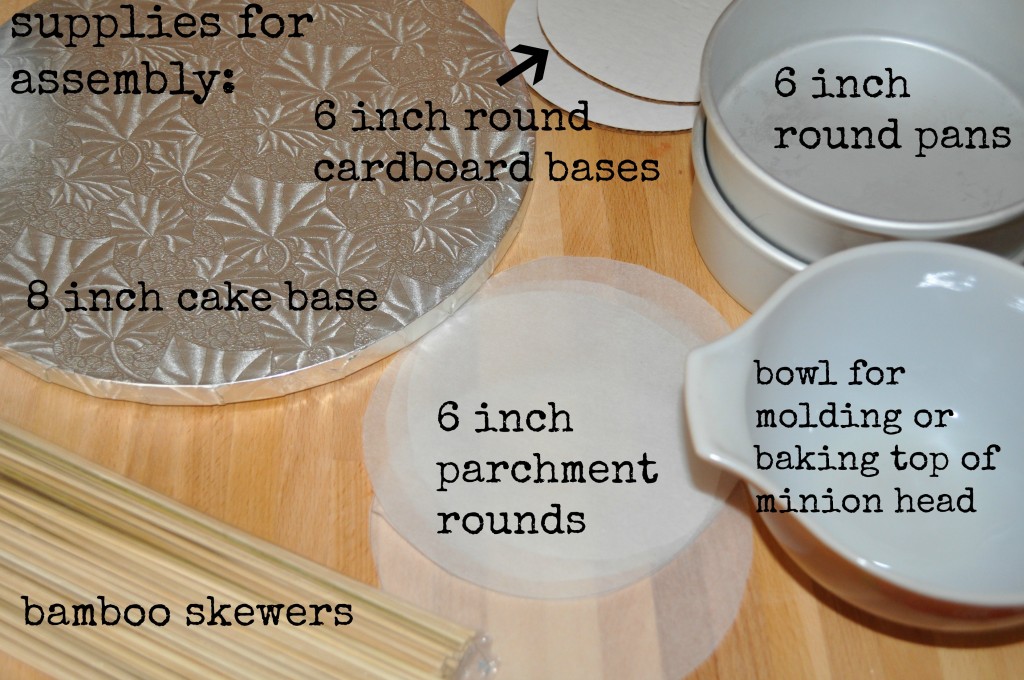
Above are the supplies I used for baking and assembling the purple minion cake. I splurged and purchased an eight inch cake base for easy transporting. You could use a cake stand or a favorite large plate if you do not need to travel far with the cake. The cardboard cake rounds for the purple minion cake were purchased at a local cake supply store. Of course you could always trace your pans onto cardboard – just be sure to make the cardboard rounds slightly larger than the cake pan. Obviously you need cake pans. I used coupons on Michael’s to buy the six inch round cake pans. Bamboo skewers are used for the assembly of the purple minion cake (more on that later.) Last, I used an oven safe bowl to bake the rounded portion for the top of the purple minion cake. If your bowl is not oven safe you could easily use rice krispy treats to form the rounded portion of the purple minion cake. Don’t forget the ingredients for the cake and the buttercream frosting. Here is my favorite cake recipe and here is my favorite buttercream recipe. Use whatever you are most comfortable with, but make sure the cake is sturdy.
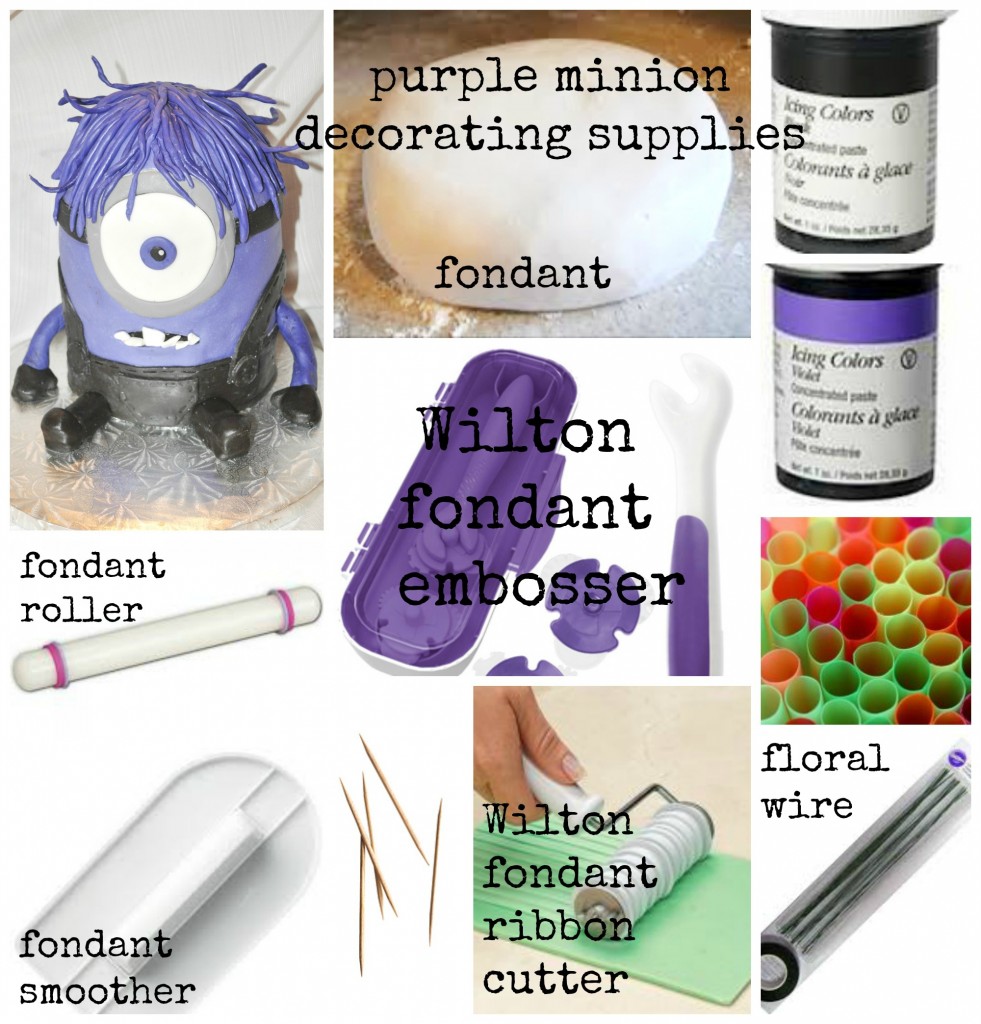 Okay do not be overwhelmed by the supply list for the purple minion cake. Most of these items can be found at local craft stores. Some are even available at your favorite super center. To start – marshmallow fondant. Because I am always trying to save money I prefer to make my own fondant. The recipe for making fondant is found here. I will admit, this takes some practice. If the fondant is too moist, it will fall apart when you try to drape it over the cake. If the fondant is too dry, it will tare as you put it over the cake. At the same time, the fondant needs to be a bit dry for details… to make it easier feel free to buy prepared fondant. The highest quality fondant can be found at cake decorating supply stores.
To continue, be sure to have purple and black food coloring to make the fondant the right color for the purple minion cake. Use high quality food coloring for bold color. I would also suggest covering your hands in a plastic bag or disposable food service gloves. Your hands will be dyed as well if you are not careful. Some other basics pictures above – a rolling pin for the fondant. I use a large silicon rolling pin for large pieces of fondant and the little one for details. Also a fondant smoother is great for getting the surface flat. My cakes are far from perfect, but this tool does help a lot when making any fondant covered cake. The Wilton fondant embosser is the newest tool in my cake arsenal. This made it so easy to add stick marks to the minions overalls. I am sure I will use this again. Toothpicks were used to support the arms on the purple minion cake. The Wilton ribbon cutter was essential in quickly cutting the straps for the overalls and for the goggles. Floral wire was used for making some of the hair stand up.
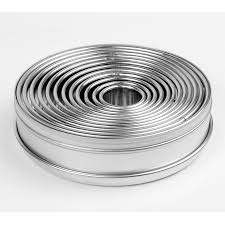
I forgot something! The Ateco round cookie cutters I used for making the purple minion cake’s eyes. You could use cups or something else but these cutters made it very easy. Later I will detail which sizes I used. The large straw was used for the purple minion cake eyes.
Step 2 – How to Make a Purple Minion Cake – Bake the cake layers and prepare icing
As I said earlier, I used my favorite cake recipe for the purple minion cake. Make sure the cake layers are sturdy. Also make the buttercream icing ahead of time so that before the birthday you can focus your energy on decorating the purple minion cake.
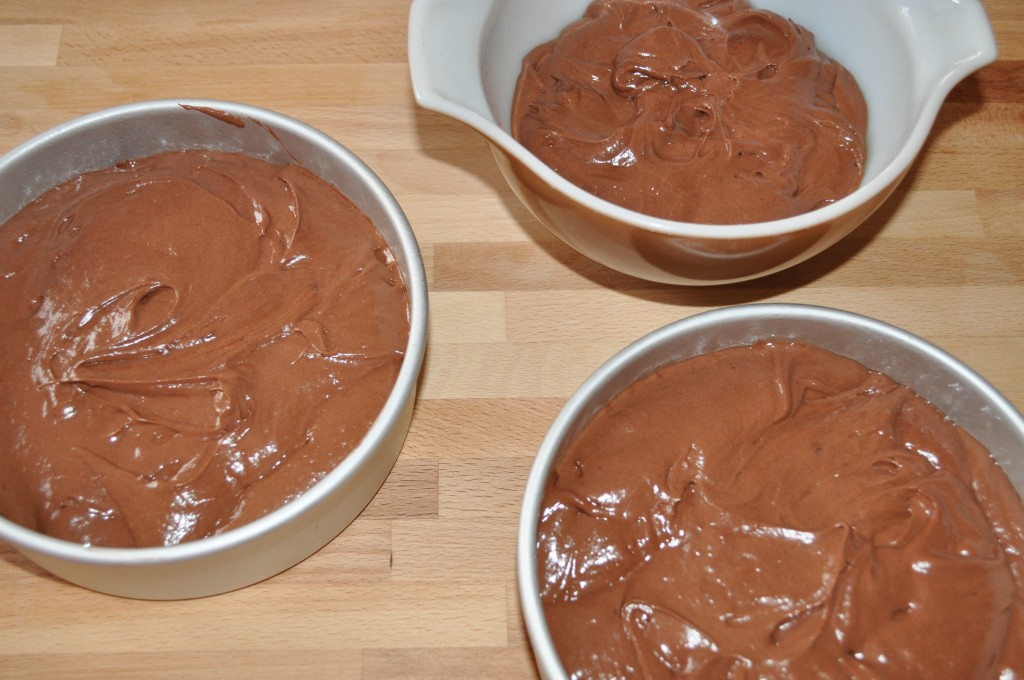
This is how I filled the cake pans – it turned out just right. I have a vintage pyrex oven safe bowl that worked great for the top of the purple minion cake.
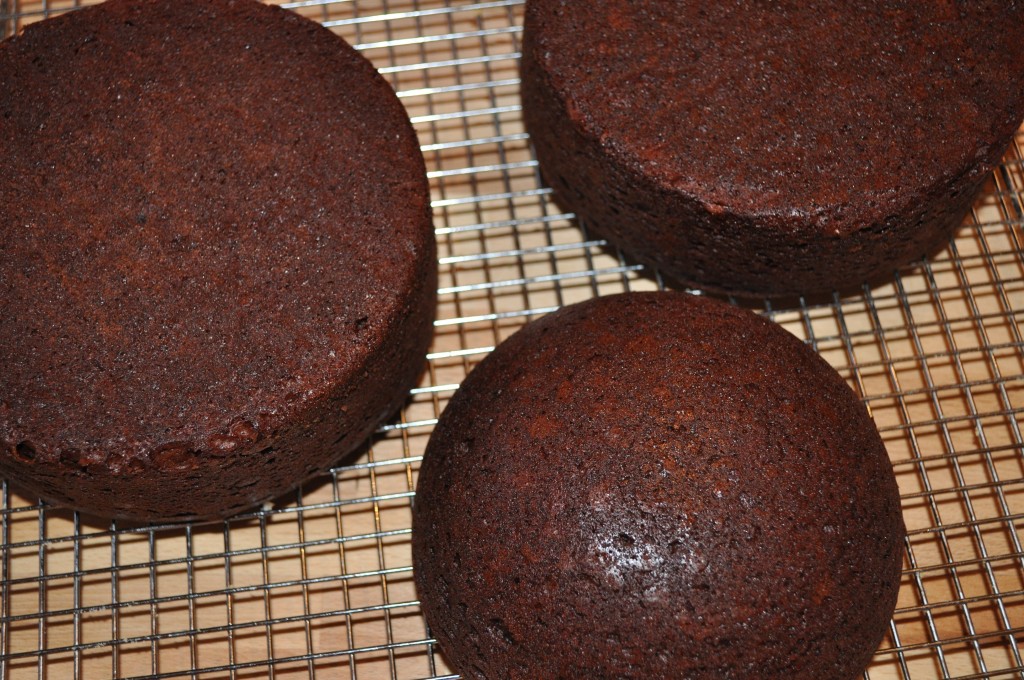 After baking! Because the six inch rounds were lined with parchment paper it was so easy to remove the cake from the pan. Use lots and lots of cooking spray for the bowl.
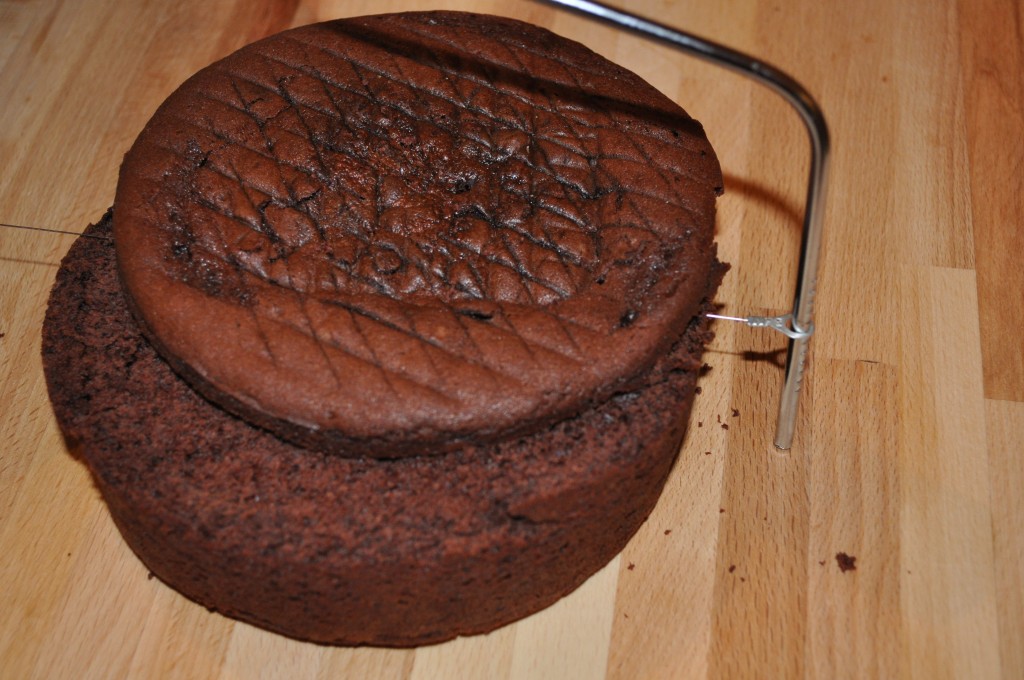 Before freezing I use a cake leveler to cut the layers to 1.5 inches high. This helps keep the cake even when stacking layers for the purple minion cake.
Step 3 – How to Make a Purple Minion Cake – Assemble the cake layers and cover in buttercream
The first time I made a minion cake I was terrified of this step. When it’s all done, it’s really not that scary assembling a 3D minion cake. I am using bamboo skewers from the grocery store. You could use more professional cake supports, food safe wooden dowels or whatever is convenient for you. Whatever you use to assemble the purple minion cake the concept is the same – support columns hold up an inner piece of cardboard keeping the cakes from being flattened from the weight of all the cake and frosting.
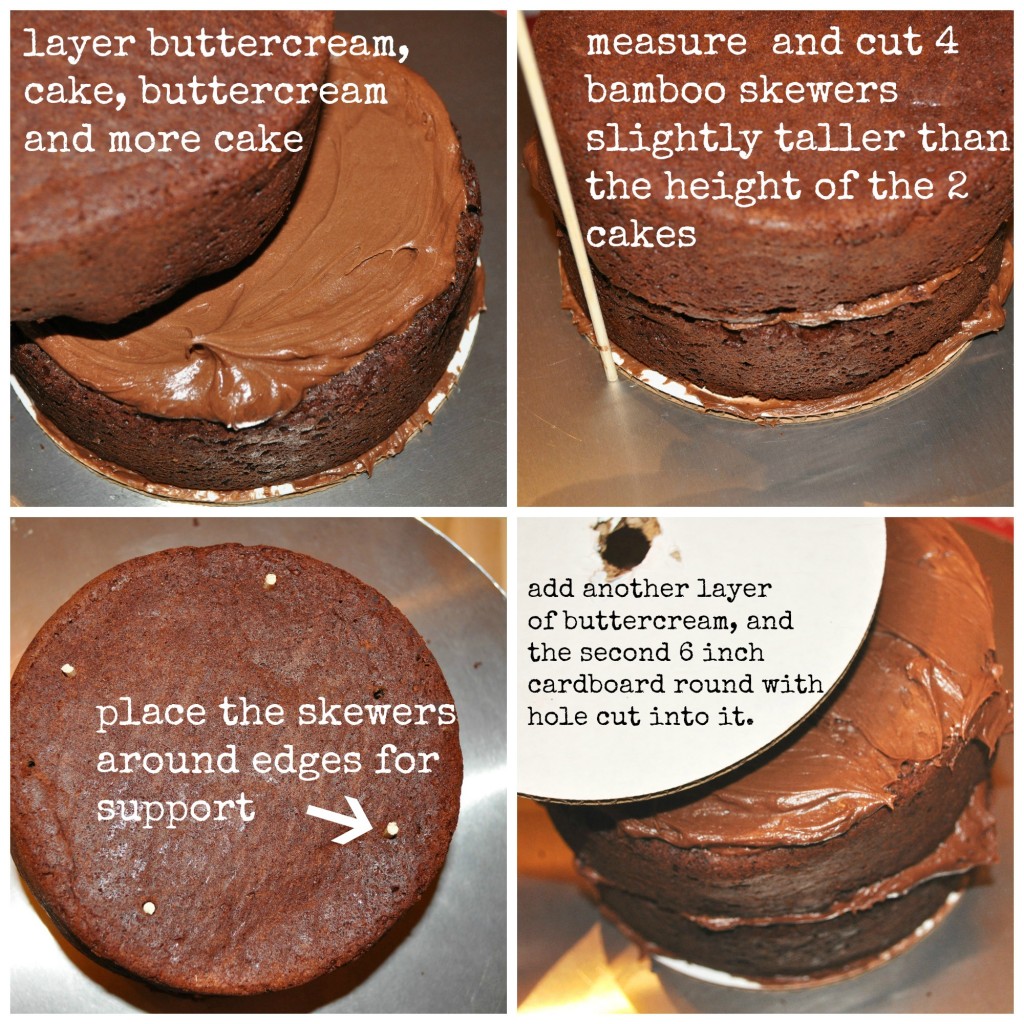
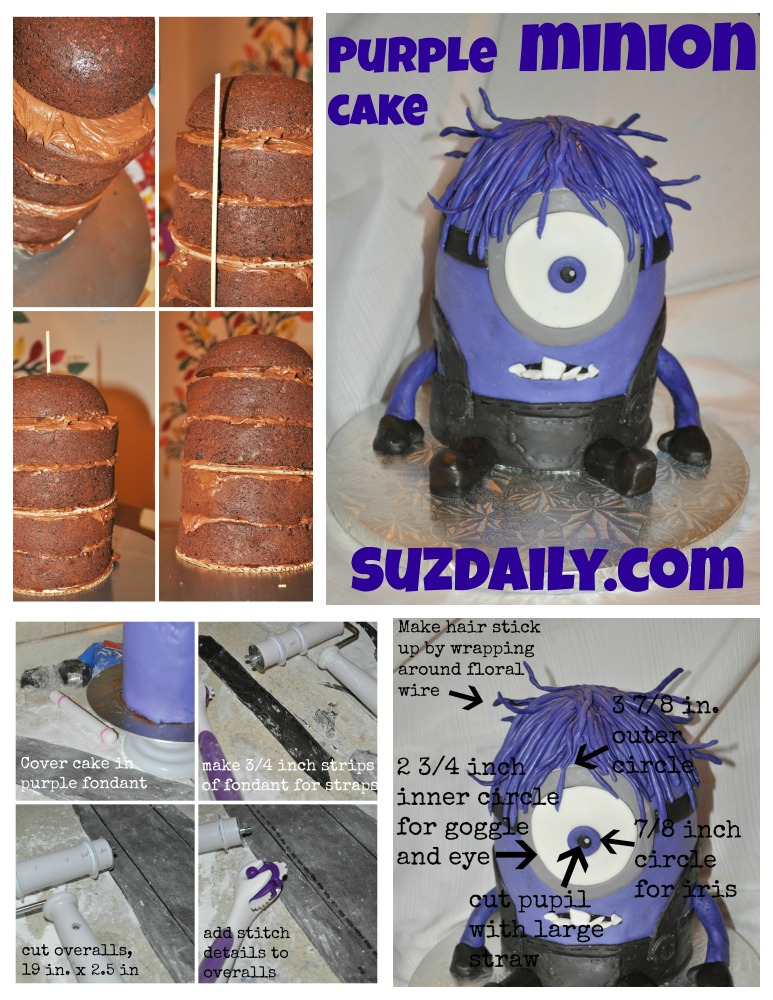
Time to assemble the purple minion cake. I start out by putting a layer of frosting on the six inch cardboard round. After I add the first of the six inch round layers. After that, more frosting. Now place the second of the six inch round cake layers on top of the frosting. Now is a good time to measure the supports. Cut the skewers slightly higher than the two layers of cake so there is room for the buttercream. I cut the skewers about 1/4 inch above the second cake layer so I would have room for plenty of frosting. On top of that add the second cardboard round. Cut a small hole in the center of the second cardboard round. Later a skewer will be placed through the length of the purple minion cake to keep the cake from falling apart. Make sure to remove the bamboo skewers when serving the cake.
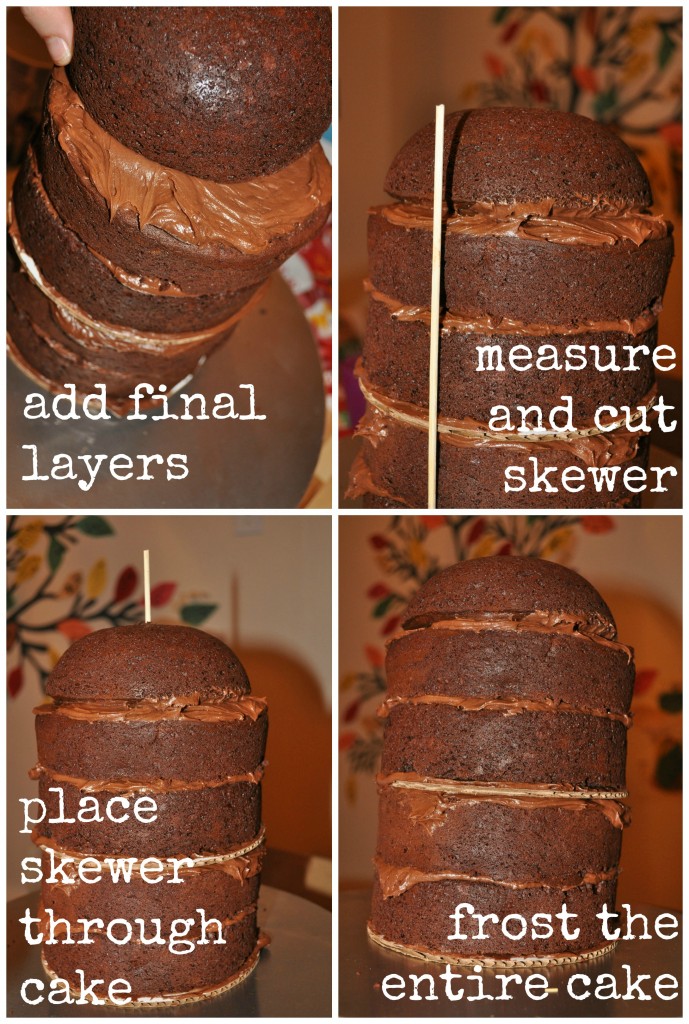 Continue assembling the purple minion cake. After the second cardboard round add more frosting, cake, frosting, cake, frosting and rounded cake. At this point measure a skewer to be the height of the entire cake. This holds the entire cake structure together. Carefully place the skewer through the center of the stacked cake. Now you are ready to frost the entire minion. This would be another great place to stop. If you make the purple minion cake in stages it is much less overwhelming.
Step 4 – How to Make a Purple Minion Cake – Cover in fondant and add details
Okay now the fun really starts! Decorating the purple minion cake. I will not go into details about working with fondant. Just be patient. Try to use drier fondant for the details and make sure the purple fondant used for covering the minion is rather flexible so it can stretch over the minion cake. For this project you will need:
2 batches marshmallow fondant, recipe found here, or store bought fondant
- 1/2 of the fondant dyed purple for the minion skin
- about 1/3 of the fondant dyed black for the overalls
- a small amount of gray fondant (use just a touch of black food coloring) for the goggles
- an even smaller amount of white fondant for the goggles, eye and teeth
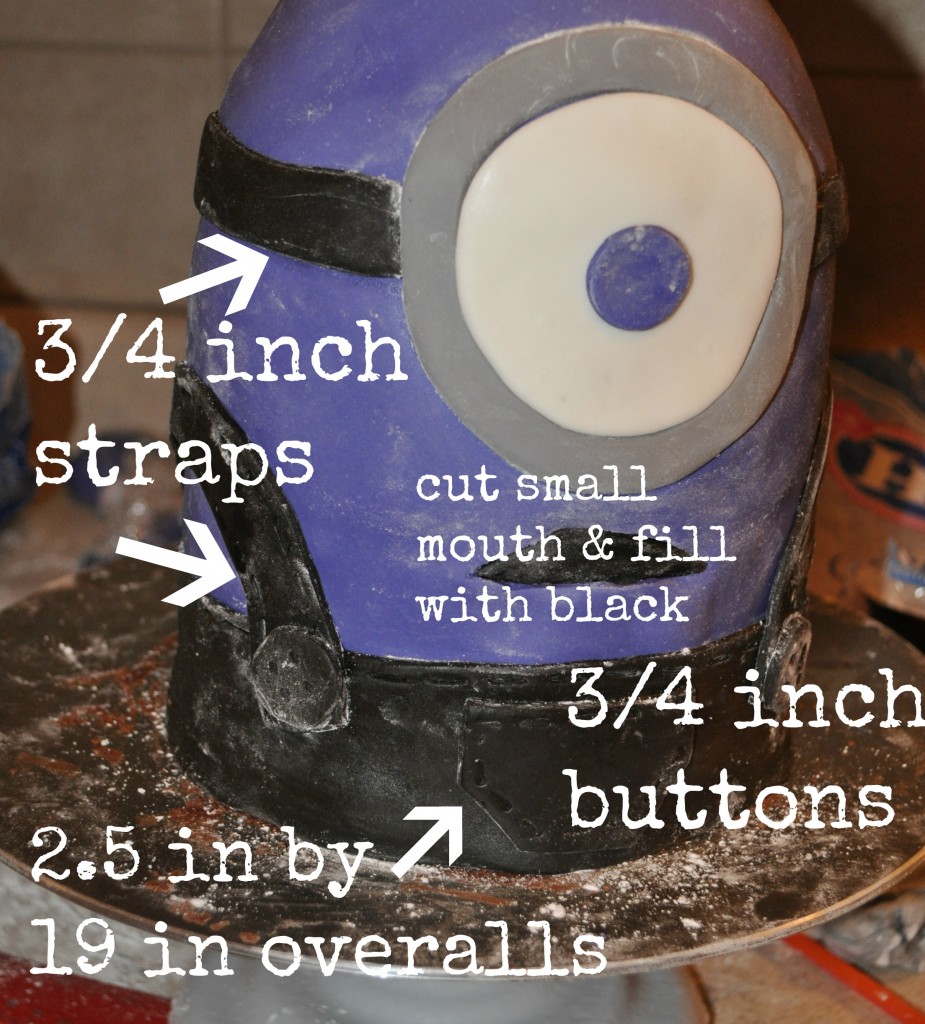
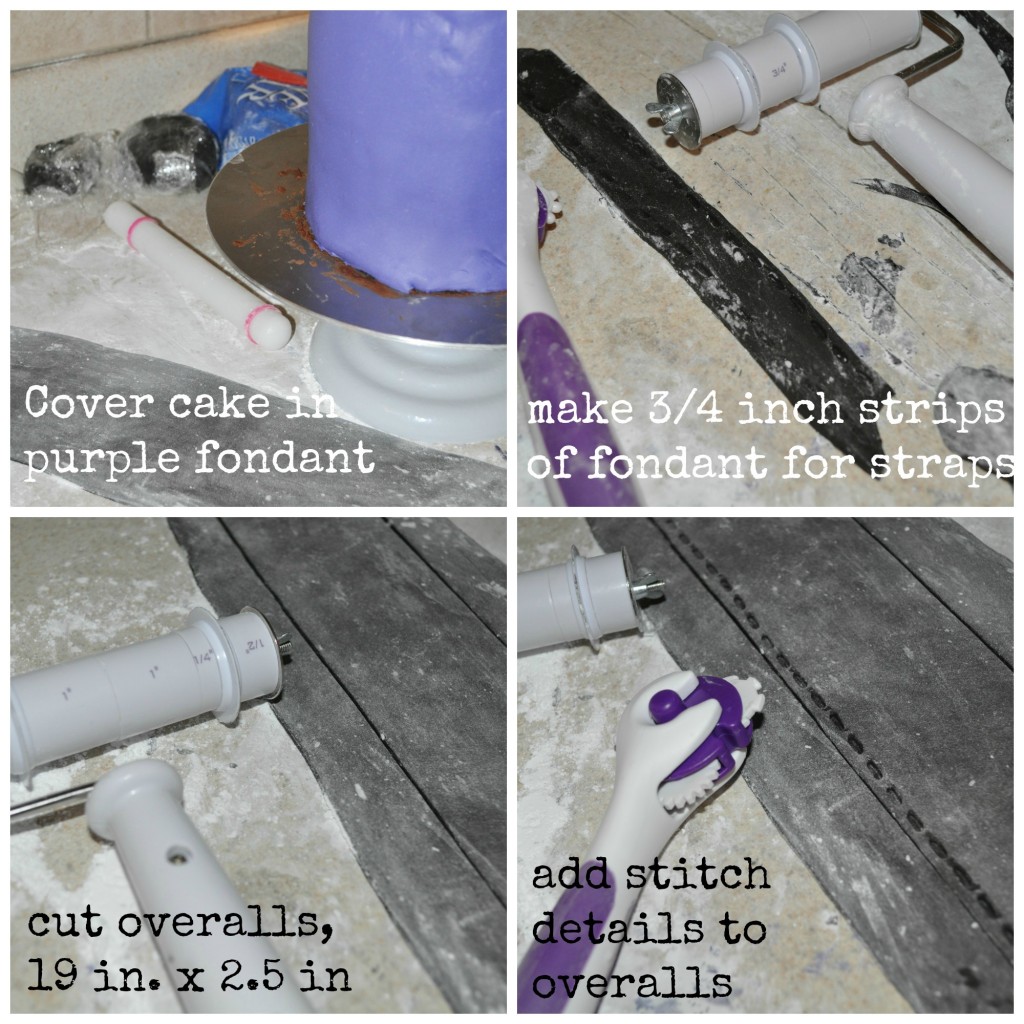 I start by covering the minion in purple fondant (another good stopping place). From there I work on the black details. I roll the fondant very thin and into long strips. Using the ribbon cutter I make black overalls measuring approximately 2.5 inches by 19 inches. After I add the stitch details using the wilton embossing fondant tool. This is then wrapped around the base of the purple minion. This hides and mistakes in the base of the purple fondant.
After that I make the straps for the overall in the same way. The straps measure 3/4 inches wide. I cut a pocked freehand and add stitch designs. Black buttons are cut approximately 3/4 inches round using the Ateco round cookie cutter set. A mouth is carved into the purple and filled with black fondant. Toothpicks are used to support the arms, molded out of the purple and black fondant. Legs are placed near the overalls.
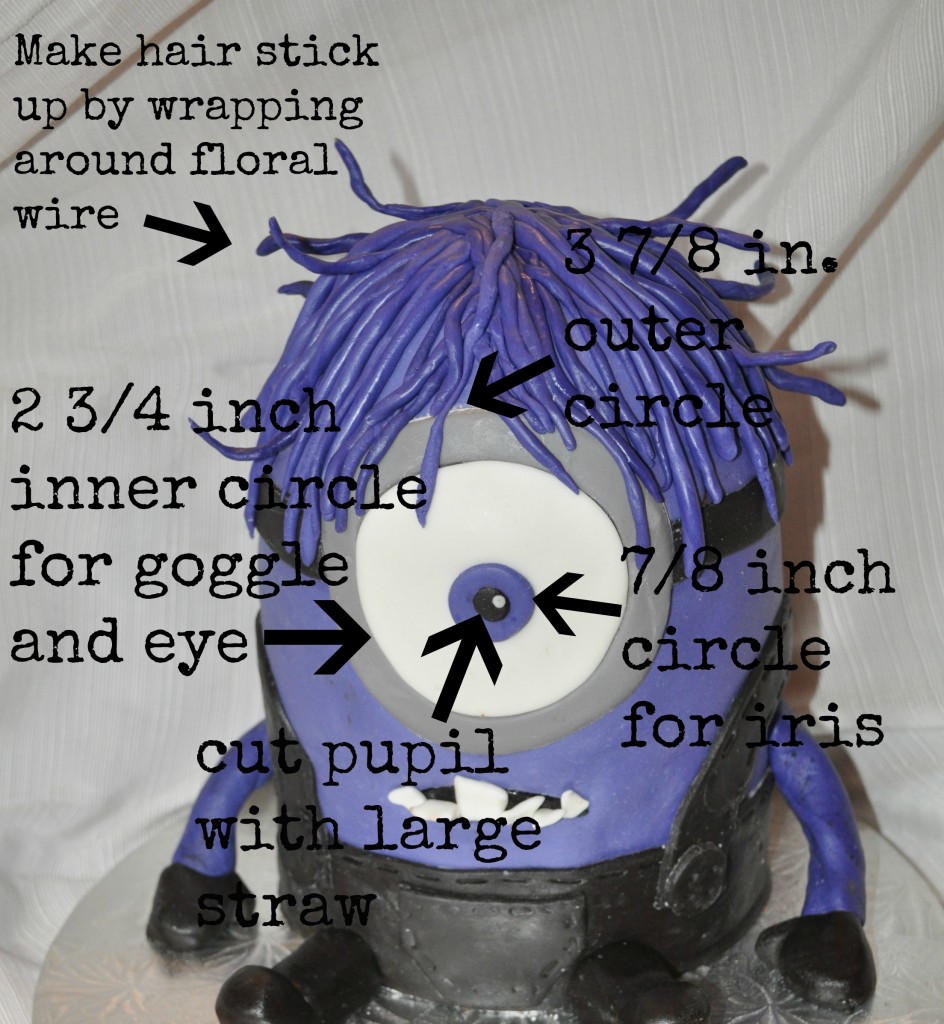
Continue with the details. As shown above, I used the Ateco round cutters to make the minion goggles. The outer circle measures 3 and 7/8 inches. The inner circle for the eye and the inside edge of the goggles measures 2 and 3/4 inches. The iris is cut using a 7/8 inch Ateco cutter. The black pupil is made using a large gas station straw. On top of that add a teeny tiny bit of white fondant. Make several strands of hair by rolling purple fondant. Wrap some of this fondant around floral wire so that it sticks up. I wish I had access to purple cotton candy to make really crazy hair!
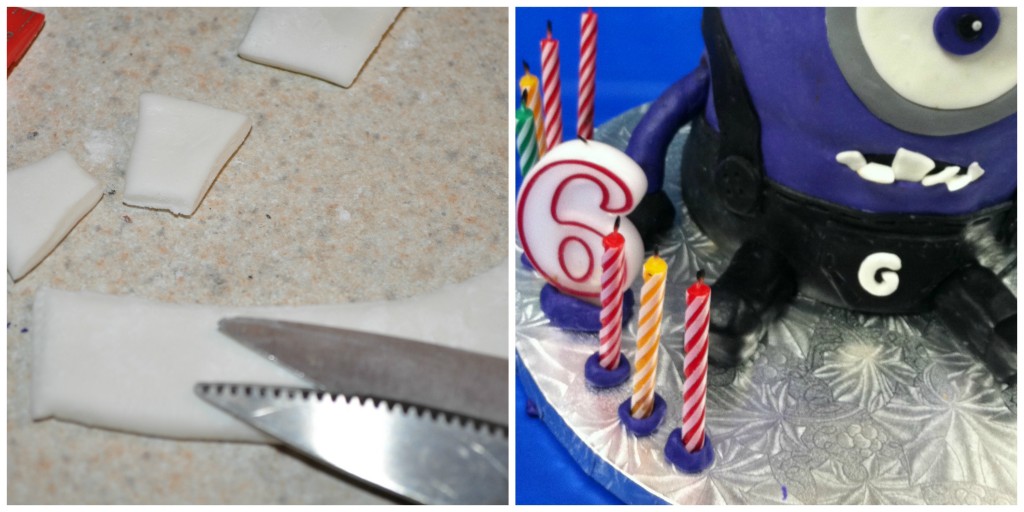
Continue with final details. I cut jagged shapes for the purple minion teeth. I used extra fondant to hold up birthday candles. I cut a “G” for the birthday boy, Grant. Add as many details as you have time for. This is my favorite part of decorating the cake. Clean up the extra powdered sugar with a slightly damp paper towel. The kids loved this cake! It would be so much fun to make another purple minion cake!


Cool!